
Extruded Aluminum Vents
"EX" EXTRUDED ALUMINUM WALL VENTS
(Specifier Note: The purpose of this guide specification is to assist the specifier in correctly specifying brick and foundation wall vent products and their installation. The specifier needs to edit the guide specifications to fit the needs of specific projects. Contact a Sunvent Industries Product Representative to assist in appropriate product selections. Throughout the guide specification, there are Specifier Notes to assist in the editing of the file.
References have been made within the text of the specification to current MasterFormat section numbers and titles, specifier needs to coordinate these numbers and titles with sections included for the specific project. Brackets [ ] have been used to indicate when a selection is required.
SECTION 08 95 16
WALL VENTS
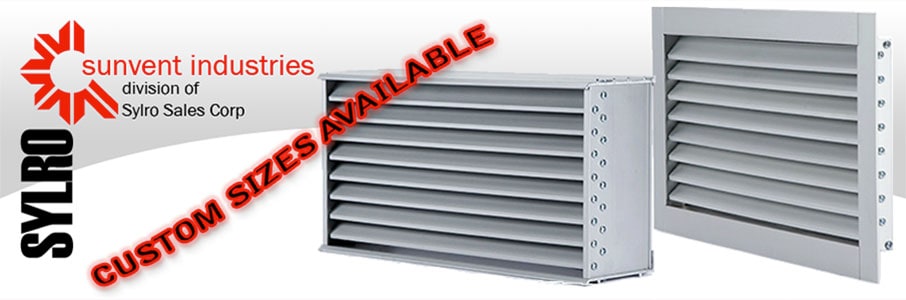
Sunvent Industries
EX Series Extruded Aluminum Wall Vents
PART 1 - GENERAL
1.1 SECTION INCLUDES
- [Custom] [Standard] size extruded aluminum wall vents with fixed louvers for installation in [masonry] [concrete] [framed] [insert wall description] walls for ventilation.
- Accessories: Insect screens [, adjustable damper,] [duct extension,] [and] [inside register].
1.2 REFERENCES
- American Architectural Manufacturers Association (AAMA)
- AAMA 605.2 - Voluntary Specification for High Performance Organic Coatings on Architectural Extrusions and Panels.
- AAMA 606.1 - Voluntary Guide Specification and Inspection Methods for Integral Color Anodic Finishes for Architectural Aluminum.
- AAMA 607.1 - Voluntary Guide Specification and Inspection Methods for Clear Anodic Finishes for Architectural Aluminum.
- ASTM International
- ASTM B209 - Aluminum and Aluminum-Alloy Sheet and Plate.
- ASTM B221 - Aluminum-Alloy Extruded Bar, Rod, Wire, Shape, and Tube.
- International Residential Code (IRC): Current edition.
- International Building Code (IBC): Current edition.
1.3 SUBMITTALS
(Specifier Note: DELETE Submittal Procedures paragraph when not required. Coordinate requirements with Division 01, Section 01 33 00 – Submittal Procedures.)
- Refer to Section [01 33 00 Submittal Procedures] [insert section number and title].
- Product Data: Submit manufacturer current technical literature for each type of product.
- Shop Drawings: Submit detailed drawings showing vent construction, dimensions, and installation details.
- Samples: Provide minimum 3 x 5 inch of each color indicated.
(Specifier Note: DELETE LEED submittal requirements when project is not pursuing LEED certification. LEED-NC v2.2 credits are in red LEED-NC v3 credits are in red bold.)
- LEED Submittals:
- Material and Resources (MR)
- Product Certificates for Credit [MR 4] [MR 4.1[and Credit MR 4.2]]: For products having recycled content, documentation indicating percentages by weight of postconsumer and preconsumer recycled content.
- Product Certificates for Credit [MR 5] [MR 5.1[and Credit MR 5.2]]: For products and materials required to comply with requirements for regionally manufactured materials. Include statement indicating cost, location of manufacturer, and distance to Project for each regionally manufactured material.
PART 2 - PRODUCTS
(Specifier Note: If wall vents are to be included in a Division 3 – Concrete, Division 4 – Masonry or Division 07 – Thermal and Moisture Protection section copy “Wall Vents” article into appropriate Section and delete “Substitution Limitations” and “Materials” paragraphs, edit remaining paragraphs for project conditions.)
2.1 WALL VENTS
- Manufacturer: Sunvent Industries, a division of Sylro Sales Corporation, 1 Industrial Drive, No. 26, Pelham, New Hampshire 03076; 800-325-4115; www.sunventindustries.com .
- Model: EX Series Extruded Aluminum Wall Vent.
(Specifier Note: DELETE or COORDINATE Substitution Limitations paragraph if substitutions are addressed in Division 01, Section 01 21 00 – Substitution Procedures.)
- Substitution Limitations:
- Submit written request for approval of substitutions to the Architect [a minimum of [14] days prior to the date for receipt of bids] [Insert time period].
- Substitutions following award of contract are not allowed except as stipulated in Division 01 – General Requirements.
- Materials:
- Extruded aluminum: 0.125 inch minimum thickness extruded aluminum complying with ASTM B221, Alloy 6063, Temper T-5.
- Sheet aluminum: 0.040 inch minimum thickness complying with ASTM B209.
- Fasteners: Type, size, and spacing as recommended by vent manufacturer for project conditions.
(Specifier Note: Include sealant paragraph if vents are to be installed with sealant.)
- Sealant and backer rod: Type as [specified in Section 07 92 00 - Joint Sealants] [Insert section number and title] [recommended by vent manufacturer].
(Specifier Note: Wall vents can be ordered in standard sizes ranging from 8 1/8 inch wide by 2 3/8 high to 48 inches wide by 7 3/4 inch tall. Refer to Sunvent product literature for available stock sizes. Custom sizes can be ordered to up to 96 inches in width or height without exposed mullions. Contact Sunvent Industries for load capacities of extruded aluminum wall vents.)
(Specifier Note: When determining vent size Chapter 12; Section 1203.3 of the IBC or Chapter 4; Section R408 of the IRC requires 1 square foot of free area for every 150 square feet of under floor area with one vent opening located within 3 feet of each corner. If the ground within the under floor area is covered by a Class 1 vapor retarder the vent requirement may be decreased to 1 square foot of vent area for every 1,500 square feet of under floor area provided that the vents are placed to allow for cross-ventilation of the under floor area.)
Wall Vent Free Area in square feet – Standard Sizes:
|
|
Vent Height (inches) |
|||||
|
Vent Width (inches) |
|
2-3/8 |
4-3/4 |
7-3/4 |
11-3/4 |
15-3/4 |
|
8-1/8 |
0.029 SF |
0.080 SF |
0.136 SF |
0.207 SF |
0.279 SF |
|
|
12-5/8 |
0.044 SF |
0.120 SF |
0.204 SF |
0.310 SF |
0.418 SF |
|
|
15-5/8 |
0.056 SF |
0.156 SF |
0.263 SF |
0.400 SF |
0.540 SF |
|
|
16-1/2 |
0.060 SF |
0.196 SF |
0.280 SF |
0.426 SF |
0.575 SF |
|
|
24 |
0.088 SF |
0.271 SF |
0.408 SF |
0.620 SF |
0.836 SF |
|
|
32 |
0.117 SF |
0.321 SF |
0.543 SF |
0.826 SF |
1.115 SF |
|
- Nominal [standard] [custom] sizes:
- Width: [8-1/8] [12] [15-5/8] [16-1/2] [24] [32] [48] [Insert required width by height] inches.
- Height: [2-3/8] [4-3/4] [7-3/4] [11-3/4][15-3/4] [Insert required width by height] inches.
- Depth: 4 inches
- Free Area per vent: [Insert wall vent free area]
- Construction: Extruded aluminum framed vent without flanges and with overlapping horizontal louver blades fabricated from extruded aluminum sections.
- Louver blades: Fixed, horizontal blades 1 inch deep at 1 inch centers. Blade shall be set at 45 degrees. Top of blade formed with storm drip.
- Frame:
1) Material: Extruded member with mortar ribs.
2) Top of frame shall have an integral drip edge at front of frame.
3) Bottom of frame shall have an integral water stop at back of frame and integral drip edge at front of frame.
- Fabricate vents with mechanical connections such that all fasteners are concealed when vent is installed.
- Insect screen: Aluminum 18 by 14 mesh screen set behind louvers in extruded stop on frame.
- [Accessories:
- [Opposed vertical blade damper: Opposed vertical blade damper set behind horizontal fixed louver blades, unit shall be operable from exterior of vent with screwdriver.]
(Specifier Note: Wall vents can be ordered with duct extensions to accommodate various wall thicknesses. When opposed vertical blade damper is required, assembly must include a minimum 2 inch duct extension.)
- [Duct extension: Straight, rectangular aluminum sheet duct extension fastened to wall vent. Wall depth as indicated on Drawings.]
(Specifier Note: Wall vents can be ordered with inside registers which are shipped loose and attached to inside wall face or attached to duct extensions.)
- [Inside register: Aluminum register, with individually adjusted multi-blade register. Size to accommodate wall vent size.]]
- Finish:
(Specifier Note: Choose anodized finish, painted finish, or mill finish. Clear anodized is the standard finish if no finish is specified.)
- [Anodized Finish: [Clear anodized coating complying with AAMA 607.1 - MM10C22A31.] [[Medium] [Dark] Bronze anodized coating complying with AAMA 606.1 - MM10C22A44.]]
(Specifier Note: Refer to Sunvent Industries product literature for available colors.)
- [Painted Finish:
- [Thermoset polyester enamel.] [Fluoropolymer Kynar colored coating complying with AAMA 605.2.]
- Color: [Insert color choice] [As selected by Architect from manufacturer's standard range] [Custom color as designated by Architect].]
- [Mill Finish.]
(Specifier Note: Delete if no duct extensions or inside registers are required.)
- Insect Screen [,] [Adjustable Damper] [Duct extension] [and] [Inside Register]: Mill finish.
PART 3 - EXECUTION
3.1 EXAMINATION
- Provide field measurements as required to achieve proper fit of wall vents.
- Concrete formwork:
- Verify that block-outs have been provided in foundation wall formwork.
- Verify that recommended clearances have been provided to allow for installation of wall vent.
3.2 PREPARATION
- Masonry Construction:
- [Install vents as masonry work progresses verify construction schedule and have wall vents delivered so as to avoid delays.]
- [When vents are to be installed after masonry work has been completed verify that masonry has support to span vent opening.]
3.3 INSTALLATION
- General:
- Do not install vents that are damaged or scratched. Replace damaged and scratched vents.
- Install vents secure, level, plumb, and flush with wall surface.
- After installation is complete seal around perimeter flange of vent with sealant.
(Specifier Note: Include “Masonry Construction” paragraph if vents are to be installed as masonry wall is constructed.)
- Masonry construction:
- Build vents into wall with mortar as part of masonry construction specified in Section [04 20 00 – Unit Masonry] [insert section number and title].
- Protect exposed vent surfaces from wet mortar.
- Install vents, [dampers] [and] [duct extensions] in accordance with manufacturer's installation instructions and approved shop drawings.
- When vents are wider than 30 inches, set only top and bottom of vent in mortar. At vent sides use backer rod and sealant to allow for expansion and contraction of vent.
(Specifier Note: Include “Masonry construction” or “Concrete foundation walls” paragraph if vents are to be installed after wall is constructed and finished. Delete paragraph if vents are installed as masonry wall is constructed.)
- [Masonry construction] [and] [Concrete foundation walls]:
- Install vents, [and] [duct extensions] in accordance with manufacturer's installation instructions and approved shop drawings.
(Specifier Note: Choose from 2 attachment methods, mechanical attachment at rear of vent is preferred by manufacturer.)
- [Mechanical attachment: Mechanically secure vents to wall substrate at rear of vent.]
(Specifier Note: Clip angle attachment method is used when fasteners at rear of vent are not possible to install.)
- [Clip Angles: Mechanically secure vents to wall substrate using minimum two clip angles. Fabricate wall angles to suit wall thickness and mechanically attach to rear of vent box for concealed attachment.]
- Attach inside registers to [duct extensions] [inside face of wall] in accordance with manufacturer's installation instructions and approved shop drawings.
3.4 CLEANING AND PROTECTION
- Allow wet mortar or cement plaster on exposed vent surfaces to harden, but not set, prior to removal. Mortar or cement plaster shall be cleaned from vent with dry burlap rag to prevent scratching.
- Remove excess sealant with mineral spirits or other solvent acceptable to sealant manufacturer.
- Wash exposed surfaces with solution of mild detergent applied with soft cloth. Remove dirt from corners. Wipe surfaces clean.
END OF SECTION